Swiftで現在地の緯度経度と住所を取得
手順
1. XcodeでSingleViewApplicationのProjectを作成
2. Build PhasesからLink Binary With Librariesをクリック、CoreLocation.frameworkを追加
参考:http://rshankar.com/get-your-current-address-in-swift/
3. Main.storyboardに緯度経度と住所用のLabelと実行用のButtonを配置
参考:開発環境の構築から一緒に始めよう! ーSwiftで始めるiOSアプリ開発【1限目】 - 無料動画学習|schoo(スクー)
超初心者向けの動画でのレッスンなので進みが遅いが、初めてXcodeでアプリ開発する人にとってはありがたい。
Label,Buttonとコントローラの変数?を関連づける際に、storyboardのView Controllerを選択した状態でないと、動画のスライドで説明している、関連づける変数が表示されないのにハマったので注意。個別のLabel,Buttonを選択した状態では、そのコンポーネントで設定可能なものだけが表示される。これは他の説明サイトでのスクリーンショットでも、同じような画面で説明していて、意味が分からなかった。
Labelは関連づけ可能な変数が表示されるのでわかりやすいが、Buttonの場合はSent Eventに指定動作のイベントがリスト表示される。
4. info.plistの設定
supporting files -> info.plist を開く
+マークをクリックして、新規項目を追加。
キー名:NSLocationAlwaysUsageDescription
値:Use CoreLocation!
参考:001 現在の位置情報の取得 - Swift Docs
5. ViewController.swift のソースコード
以下のようになる。
//
//  ViewController.swift
//  iOSApp
//
//  Created by pandazx on 2014/11/03.
//

import UIKit
import CoreLocation

// CLLocationManagerDelegateを継承
class ViewController: UIViewController, CLLocationManagerDelegate {

    var lm:CLLocationManager
    var longitude: CLLocationDegrees
    var latitude: CLLocationDegrees

    // storyboardで関連づけるLabel
    @IBOutlet var latlonLabel: UILabel!
    @IBOutlet var addressLabel: UILabel!

    // CLLocationManagerDelegateを継承すると、init()が必要になる
    required init(coder aDecoder: NSCoder) {
        lm = CLLocationManager()
        longitude = CLLocationDegrees()
        latitude = CLLocationDegrees()
        super.init(coder: aDecoder)
    }

    // ボタンが押された時の処理(storyboardで関連づける)
    @IBAction func btnGetLocation(sender: AnyObject) {
        // get latitude and longitude
        lm.startUpdatingLocation()
    }

    // 画面表示後の処理
    override func viewDidLoad() {
        super.viewDidLoad()

        lm = CLLocationManager()
        lm.delegate = self

        // セキュリティ認証のステータスを取得
        let status = CLLocationManager.authorizationStatus()

        // まだ認証が得られていない場合は、認証ダイアログを表示
        if status == CLAuthorizationStatus.NotDetermined {
            println("didChangeAuthorizationStatus:\(status)");
            // まだ承認が得られていない場合は、認証ダイアログを表示
            self.lm.requestAlwaysAuthorization()
        }

        // 取得精度の設定
        lm.desiredAccuracy = kCLLocationAccuracyBest
        // 取得頻度の設定
        lm.distanceFilter = 100
    }

    // 位置情報取得成功時
    func locationManager(manager: CLLocationManager!, didUpdateToLocation newLocation: CLLocation!, fromLocation oldLocation: CLLocation!){

        longitude = newLocation.coordinate.longitude
        latitude = newLocation.coordinate.latitude
        self.latlonLabel.text = "\(longitude), \(latitude)"

        // get address
        CLGeocoder().reverseGeocodeLocation(manager.location, completionHandler: {(placemarks, error)->Void in
            if error != nil {
                println("Reverse geocoder failed with error" + error.localizedDescription)
                return
            }
            if placemarks.count > 0 {
                let pm = placemarks[0] as CLPlacemark
                self.displayLocationInfo(pm)
                //stop updating location to save battery life
                self.lm.stopUpdatingLocation()
            } else {
                println("Problem with the data received from geocoder")
            }
        })
    }

    // 位置情報表示
    func displayLocationInfo(placemark: CLPlacemark) {
        var address: String = ""
        address = placemark.locality != nil ? placemark.locality : ""
        address += ","
        address += placemark.postalCode != nil ? placemark.postalCode : ""
        address += ","
        address += placemark.administrativeArea != nil ? placemark.administrativeArea : ""
        address += ","
        address += placemark.country != nil ? placemark.country : ""
        self.addressLabel.text = address
    }

    // 位置情報取得失敗時
    func locationManager(manager: CLLocationManager!, didFailWithError error: NSError!) {
        NSLog("Error while updating location. " + error.localizedDescription)
    }

    override func didReceiveMemoryWarning() {
        super.didReceiveMemoryWarning()
        // Dispose of any resources that can be recreated.
    }

}参考:Swiftで現在地を取得してみた - Qiita
上記サイト以外にここまでに紹介したブログを参考にした。
5. シミュレータで実行
ボタンをクリックする前に、シミュレータの場所を設定する。
メニューバーのDebug->Location->Apple(アップル本社)を選択。
ボタンをクリックして、緯度経度と住所が表示されれば成功
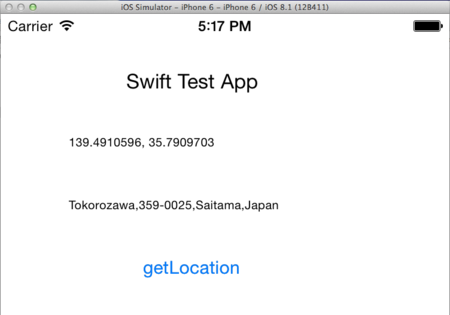
6. 結果

住所はテキトーにCustom Locationで入力した場所。
日本でも住所が取得できるのかテストした。